I feel ya! I’ve been there myself a few times. You love those pretty displays and the images that you see presented by the designers, and you wonder exactly how to print perfect printables for yourself. What is the magic technique that they are using to get them so vibrant?
This post may contain affiliate links. (*) If you make a purchase using my links, I may receive a small commission. Please feel free to check out my full disclosure for more details.
Since the work that I do includes graphic design, I feel that I am in a perfect position to address these issues. In addition, I have fielded my fair share of questions from people who have downloaded or purchased printables from me. So, I think I have a good grasp on what people want to know.
The most frequent question that I receive is from people wanting to know how I get my printables to come out so crisp and vibrant. Do I use a professional printing service? Do I have a big commercial printer? Is there some hidden secret to the paper that I use?
No, no, and no. Anyone can get professional results, and I am going to tell you exactly what I use and how I do it. But be forewarned, this post is in-depth. So, sit back and grab your coffee! (or wine)
What Affects the Quality of a Printable?
I know some people out there have completely switched over to paperless, but I am still a bit old school. I love to see the gorgeous prints and to be able to dot things down in pen. Since you are here reading this, I assume you are the same way.
So, to begin, there are three things that can affect the quality of a printable – the file, the paper, and the printer. Two out of the three things are within your control. The only one that you can’t control is the file.
File Type and Compression…
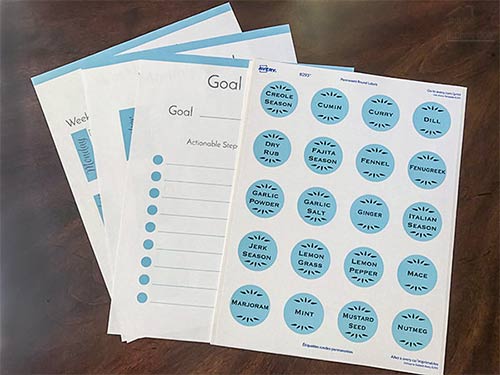
Digital downloads typically come as either a pdf, jpg, or a png file. Of these, the most common is the pdf file. That is because a pdf assures that the file will stay consistent across systems, printers, browsers, etc.
You can also find printables in jpg or png formats, but even those typically include a pdf version. These are used only if the image may need to be resized such as a logo, icon, or if it is something that is meant to be combined with other documents.
The last type of download that you may find is templates. Templates are generally offered in whatever format that the user will be editing in and are intended as an incomplete document.
For instance, I offer Photoshop templates that come as a PSD file. However, a finished and ready for print file should not be delivered in such formats to an end-user.
Printable Resolutions
Regardless of the type, the best results come from those created at 300dpi. Often times, free printables will be set at 70dpi, and while they can still look good, they probably won’t be as nice as a 300dpi.
The reason for 70dpi is generally because we bloggers put a high degree of importance on keeping images and files small. If they get too large, the Google gods frown down upon us. So, we do the best that we can.
I try to design all of my free printables at 300dpi whenever I can, but that isn’t always possible. So, to get my super high-quality stuff out there, I have an online store.
Stores will generally offer you a very high-quality print. That is because they have much more space to devote to one individual item. Reducing the file size is much less of a concern.
Just make sure that if you are paying for the print, you are getting a 300dpi quality.
How Printers Effect Printables
When it comes to printers, you really do get what you pay for. Now, I know I said that I don’t have a commercial printer, and that is true.
However, I don’t want to leave you with the impression that just any old printer will spit out a high-quality printable because they won’t. But, in this day and age, it doesn’t cost much to get a printer that will.
Fortunately for us, printers have been around awhile. That means that the technology for nice prints has pretty much reached every level of printer available on the market.
Of course, that doesn’t mean that you should expect one of those $29 printers to produce professional quality. However, you should get nice results from just about any printer in the $100-$200 price range. Stick with me for a bit more and I will share what printers I use.
Laser VS Inkjet
When it comes to choosing, I find that most people don’t know which type of printer to buy. Should you get a Laser or an inkjet?
Well, this really depends on what type of printing that you plan to do the most often. Although, you will also want to consider the pros and cons of each.
Ink Jet Pros:
With inkjet printers, you will be using ink cartridges which will spray droplets of that ink onto the paper. The ink is then absorbed and dries within a short amount of time.
Because the ink is so vibrant it is the perfect choice for printing photographs or colorful images. It is also easy to find a good printer in almost every price range.
Ink Jet Cons:
The downside of an inkjet printer is that they are prone to smudging. They also do not hold up well to wet conditions. So, they are not always the ideal choice for making labels on things like shampoos, soaps, or other items that may get wet.
Laser Printer Pros:
Laser printers use toner, heat, and drums to create a print. Toner is a powder type medium that is heated as the paper passes through a drum.
Because there is no wet ink, they will not smudge. And because toner is not activated by water, it is perfect for making labels to use in wet situations.
They also are perfect for producing mass copies of an item, which is why they are so popular in schools and offices. They print quickly and use very little toner for basic black and white prints.
Laser Printer Cons:
Laser printers tend to be a little pricier than an inkjet. To get a colored laser printer that produces vibrant images, you should expect to pay even more. This difference in cost is often a deal killer for most people.
Paper Quality and Weight…
Another big factor in how well your prints turn out is the paper used. You should always use whatever type of paper is appropriate for the situation. If you want photo quality, use photo paper. For beautiful cards, use a heavy stock.
Sounds pretty simple, doesn’t it? But not so fast! Choosing paper can be confusing if you don’t understand what the numbers mean.
First of all, you need to understand how paper’s weight is stated and what those numbers and letters mean if you are really wanting to be an expert at it. Then, you can apply that information to the weights recommended for your printer.
Metric VS Basis
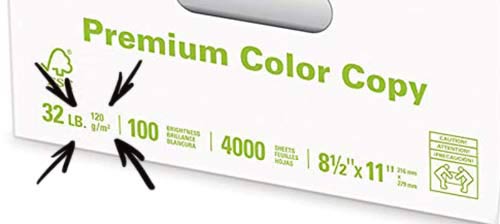
As with everything in life, there are two different ways to measure things – the US way or the metric system. Paper is measured in both ways as well.
If you see the paper’s weight listed as gsm, you are seeing the metric system and of course, if you see lbs you are seeing the US system or to be accurate, the Basis method. (image above shows location of weights)
Understanding GSM:
The metric system for paper’s weights (or gsm) is very simple to understand. The lower the number the lighter the paper will be. Go to a higher number and you will get a heavier paper.
That cheap printer paper that most of us buy for home use is 74 gsm. While paper with 175 gsm would be similar to poster boards and 215 gsm would be appropriate for business cards.
As you can see, with gsm you can learn very quickly what you want and what you are getting just by the numbers. FYI – I frequently print up to 300 gsm on my Canon printer and could probably go a bit higher, but my HP laser printer doesn’t like anything over 265 gsm.
Understanding Basis:
Here in the US, we measure our paper in pounds. Unfortunately, it is not as simple as gsm because we also have grades, such as text, bond, cover, index, bristol, and a few others. If the paper only lists lbs as a measurement guide, then you will also need to be familiar with the grades to really understand what you are getting.
For example, you might assume that a 67 lb Bristol would be heavier than a 65 lb cover, but you would be wrong. The 65lb cover grade(sometimes referred to as cardstock) would be heavier.
As another example of this discrepancy, let’s consider bond versus text grade. A 50lb text paper is the most common household printer paper. While a 28lb bond paper is brochure quality. So, you see, we have a more complicated system than the Europeans do.
This can make it hard to understand what a printer can do if you are relying on something like printer reviews from Amazon. One person’s comment of being able to use 90lb paper means nothing without the rest of the details.
Lucky for us, most papers come with both measurements. So, if you want to teach yourself the system, start out by memorizing these few guides, keeping in mind that lower numbers are reserved for less quality.
GSM Guide
- 74-90 gsm = regular paper (used for documents, stationery, and letterhead)
- 100-150 gsm = brochures, double-sided prints, and presentations.
- 165-215gsm = lightweight cardstock all the way through business cards. (photo paper, premium brochures)
- 255+gsm = heavyweight, ideal for cards and invitations. (premium photo paper)
LBS Guide
If you want to understand the American measuring system, you will need to buy your paper based on the grade that you need. Then further, make determinations from the weight.
For printables and crafts that means that you will usually be looking for bond and cover paper (cardstock).
To get a better idea of which weight is going to suit your needs, take a look at the comparisons’ list below. (Note – these are just general guidelines and may vary from one manufacturer to the next).
- 28# Bond = 70# Text
- 36# Bond = 90# Text = 50# Cover
- 43# Bond = 110# Text = 60# Cover
- 58# Bond = 80# Cover
Now you can see why it so much easier to just learn to identify by gsm.
Printers I Use to Get Perfect Printables
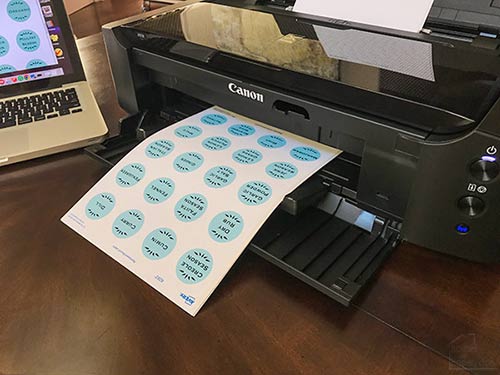
So, how am I able to print those perfect printables? Well, most of it lies in the printer. I personally have used many printers over the years. Some were great, others not so much. I don’t have a die-hard brand, but I do tend to lean towards Canon when I want a beautiful image.
Right now, I use the Canon ip8720* for most of my printables and photo printing, and an HP Color LaserJet Pro for wet labeling and document printing.
However, I believe that my specific model is no longer available, but there are plenty of other similar HP Laser Printers* on the market, and they now have Alexa controls!
The Canon ip8720* is a perfect printer for photographers and crafters. In fact, this particular model is actually touted as one of their crafting printers.
The image quality is excellent and it can print up to a 13×19 inch page. This is perfect if you like to print calendars or pages for scrapbooks, or if you want to start a printable business.
My laser printer is used when I need labels for cosmetic containers or on things that I know will likely get wet. I also use it to mass print paper, such as bullet pages for bullet journaling or for lined paper. It is also the printer that I send all of my business documents through.
However, if I needed to choose just one printer, I would go with the inkjet. It can handle everything that I need with the exception of waterproof labels, and the quality of printables is quite nice. I highly recommend it for anyone looking to impress with their prints.
What About Printer Settings?
If you have a quality printer and you are still not satisfied with what you are getting, it may be time to delve deeper into your settings.
You can have the most expensive printer in the world, but if your settings are off, you won’t like the results. So, before you throw in the towel, open up your device and check through these few things:
- Make sure your cartridges are aligned. Run a test page and make adjustments as needed.
- Do a cleaning. Clean the cartridge heads and the roller if you have that option.
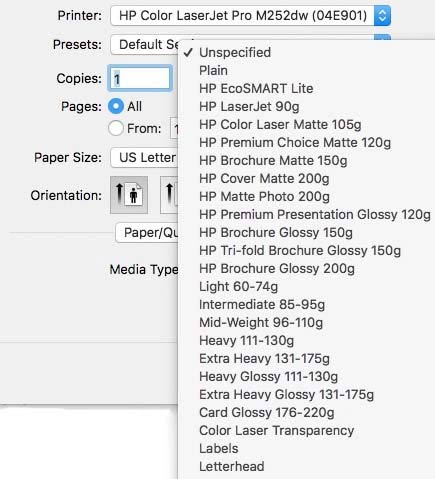
- Queue up your printer and get familiar with your Presets
When the settings are set properly, the printer should always produce the desired results. To get good prints each time, make sure that you are setting your printer to handle the paper that you are feeding it.
For the most part, the printer settings make it easy. Generally, you should just have to pick the type of paper you are using.
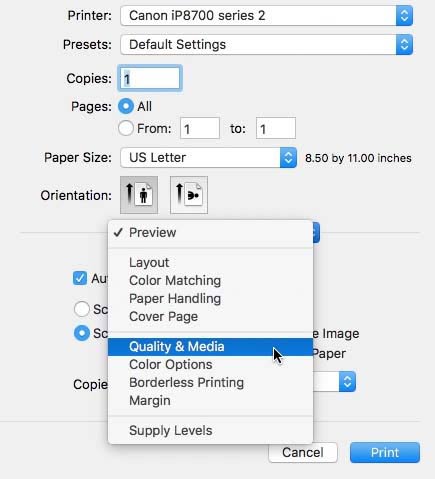
Next, check that the quality and media are set to your desired outcome. If you aren’t interested in a top-notch result you can probably get away with Fast mode (or Draft). But, to get those crisp results you will need to use the high setting.
Also, make sure to check borderless printing for anything that is supposed to cover the entire page.
Ink Quality in Printers
The best printers will have more than just a couple of cartridges. In fact, the more ink cartridges that a printer holds the better the image quality will be.
If your printer has just one black cartridge and one cartridge for the color, then this is probably an indicator that you need a better printer to get the results that you want. For instance, the Pixma ip8720* has 6 cartridges.
In addition to the number of cartridges, you should also be careful when buying generic refills. There is more to a cartridge than just the ink that it holds. Yes, they will generally work and even sometimes produce good results, but I have found that it is usually a roll of the dice.
How to Shop for Printer Paper
I’m not going to lie, I like to get my paper cheap. But, I am super picky about the quality of the print. I also like the paper to feel good in my hands and prints without bleeding or smudging.
I have to reach a happy medium between price and quality. These are the things that I consider and the reasons behind my choices.
Brightness:
The most important thing to remember for getting a good result is to always buy bright white. Even if you have to sacrifice a bit on the weight, bright white paper will always look better than a darker but heavier paper.
For all printables that I want to pop with color, I recommend at least 98 bright white or ultra white. This also is good for black and white documents that you want to have high contrast.
The only time I buy less than 98 is for my everyday documents (of which there are many) and for printing ebooks.
For ebooks or anything that will take a significant time to read, you really want to go with something around 96 brightness or less. This will reduce the strain on the eyes and produce a much more pleasant experience.
Because I wish to keep my documents in pristine condition I choose to use acid-free paper. You should always go with acid-free if you are planning to keep the print for a long time.
Other papers will yellow over time. Running a business means documents hang around for up to 7 yrs. So, I use acid-free paper.
Bond Everyday Paper:
Sometimes I will run to Target for my paper, but most of the time I order it. For me, the 20lb stuff is a bit too flimsy for my documents and the 24lb is a bit overboard.
The paper that I like for my everyday printing is this HP paper.* It is 22lb and has a brightness level of 96. Plus, if you have an Amazon account, you can add this to your dash buttons.
Bond Sturdy Printable Paper
To get beautiful printables for planners, calendars, charts, etc. I use this Hammermill paper* in 32lb. It is at 100 on the brightness level and is perfect if you want to write on your printable without having bleed through.
If you don’t plan to write on anything, you can probably go with the 28lb. Both are a bit pricier than my everyday paper, so I keep these put away for my own personal use.
Cover, Cardstock, and Photo Paper:
As far as to cover paper, it comes in such a wide variety of finishes and choices that choosing just one is impossible. You should go with one that your printer will accept and also works best for that particular project.
For instance, glossy paper (or photo paper) will produce the most vibrant results. As the paper becomes lusterless, it will absorb more ink and reflect less light, which will result in less vibrant images. That being said, there are lots of times when a glossy paper isn’t the best choice.
One thing to point out when buying cover paper or cardstock, make sure that you are not getting something too heavy for your printer. If you don’t know how much your printer can take, you may want to start with a 60lb cover and see how that works first.
If it runs through smoothly without having to be fed one sheet at a time, you can probably try the 80lb or 100lb.
If you reach a point where you are needing to manually feed each sheet through your printer, you will know that you have reached your limit in weight.
Tip – pay close attention to the gsm. That will allow you to better hone your choices if/when you go to purchase a specialty paper or if you want to buy a paper from a specialty store.
Specialty Papers:
For adhesive papers and other specialty types, I often go with Avery. I have to purchase them anyway to test my printables for the general audience, so it is a no-brainer. Plus, they are crisp and bright. So, the results are quite good with the proper settings.
Tip – Save the backings from your Avery sticky papers. It makes the absolute prints when doing ink transfers onto wood or other items. See how I do those for more ideas!
Trouble Shooting Printer Results
By now, you should have enough information to tell you how to print those perfect printables, but if you are experiencing issues, try these steps.
- If your printables are not printing all the way to the edge (i.e you end up with a margin) – check that you have your printer set to “borderless”. Make sure that you do not have the “scale” box checked. Remove any margins in printer settings. If none of this helps, your printer may not have full bleed capabilities.
- If the color is dull or lifeless – check that you are printing in “high-quality” not “draft” mode. Make sure the cartridges are not low. Make sure you have selected the correct paper in your printer settings.
- If you need a printable to print smaller than its natural size – check “scale” and insert the percentage desired.
- If the image is showing through to the backside of the paper – check that you have chosen the correct paper type in your printer’s settings. Use a heavier weight paper.
